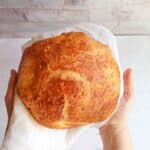
Easy Bread Recipe - No Knead Dutch Oven
This bread is so easy to make. All you need is flour, water, yeast, salt, and a dutch oven and you will be able to make this great-looking bread!
Servings: 6 people
Calories: 241kcal
Cost: $2
Equipment
- dutch oven
- bowl
Ingredients
- 3 and 1.2 cups (430g) All-purpose flour
- 2 tsp (1g) Active dry teast
- 2 tsp (8g) Salt
- 1.5 cups (345g) Water between 95 and 105 degrees
Instructions
Step One: Mix Ingredients
- In a bowl, combine flour, yeast, salt, and water.
- Stir until a shaggy, sticky dough forms.
- Note: add the salt and yeast on opposite sides initially. Direct contact can cause the salt to deactivate the yeast. However, they will integrate well when mixed with flour and water.
Step Two: Rest and Rise
- Cover the bowl with a shower cap or plastic wrap and a damp towel.
- Cover the bowl and allow it to rest at room temperature for 16- 18 hours. Yes, it takes that long! This extended rise is essential for developing the flavor. The rising time may vary based on your home's temperature.
Step Three: Second Rise
- Prepare a sheet of parchment paper by lightly dusting it with flour.
- Remove the dough from the bowl and onto the parchment paper. I like to use my hands during this step. Be gentle and try to preserve the air and gluten strands.
- Place the dough onto the parchment paper and shape it into a ball. Cover the dough with a lightly oiled piece of plastic wrap to prevent sticking. Let the dough rest for about 30 minutes.
- While the dough is resting, preheat your oven to 450°F (225°C). Place your Dutch oven on the middle rack with its lid on to preheat. The Dutch oven must be very hot when the dough goes in.
Step Four: Baking the Bread
- Carefully remove the hot Dutch oven from the oven.
- Place the parchment paper with the dough inside the Dutch oven and cover with the lid.
- Bake for 30 minutes, then uncover and bake for 15 minutes or until the crust is a deep golden brown.
- Let the bread cool for 30 minutes before slicing.
Notes
Pro Tips:
- Check for doneness by tapping the bottom of the bread; a hollow sound indicates it's ready.
- Adjust baking time based on your oven and desired crust color.
Nutrition
Calories: 241kcal | Carbohydrates: 49g | Protein: 8g | Fat: 1g | Saturated Fat: 0.1g | Polyunsaturated Fat: 0.3g | Monounsaturated Fat: 0.2g | Sodium: 585mg | Potassium: 105mg | Fiber: 3g | Sugar: 0.2g | Vitamin C: 0.01mg | Calcium: 11mg | Iron: 3mg